Here is Part 2 of Gabe W’s international transit journey. Great job as usual, Gabe!
Gabe here again! When I was last with you guys I was leaving Israel. Now, for the second part of the journey, we stayed in Madrid for five days! So, of course, our plane landed at Madrid-Barajas Airport, which is the main international airport serving Madrid (which is the capital of Spain). Now, all of the international departures and arrivals went through the HUGE Terminal 4 (there are other terminals). The reason the terminal is so big is because it is actually two terminals (T4 and T4S), which are connected by a two and a half kilometer long underground driverless people mover, aptly called the Airport People Mover. The system was built a lot like a subway shuttle line, so I counted it as a public transport system and took some pictures.
 |
| A map of the shuttle system. Terminal 4S contained “terminals” M, R, S, and U, while T4 contained H, J, and K. |
 |
|
This is what the front of each shuttle car looked like. It looks pretty similar to the Madrid Metro cars we’ll see in a little bit.
|
 |
| The interior of the car in front of us, packed with people. Also, if you look to the top of the picture, you can see a reflection of the car we were in. Of course, after we left the main terminal we just called a taxi to get to the new apartment. |
The
Madrid Metro is complicated. Not as much as NYC, but it still has 16 lines. Before we left Boston, dad printed out a map of the metro, and I spent about an hour pouring over it, trying to figure out how to get to the center of town. The good news is that the station closest to us (about half a mile away) was a transfer station, between a circular route that ran around the city surrounding the downtown area and one of the routes that cut right through the center. The Station’s name was
Legazpi, and it was about 2 miles from the downtown area.
Now, Legazpi was a pretty innovative station. It was built around a rotary (which are really common in Madrid) and had three headhouses. The outer lane of the rotary was actually a busway, and it went right by the main headhouse. The main headhouse was a small, glass rectangular building with an entrance for the escalators in the front and elevators in the back.
 |
| The main entrance to Legazpi, with the escalator entrance showing. |
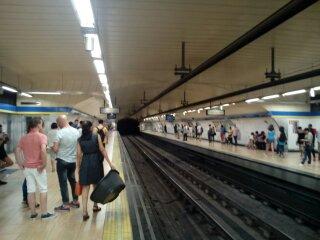
The station as a whole was really clean and modern. After going through the spacious mezzanine (which had plenty of ticket machines), the fare control area was directly linked to the outbound platform of Line 3. Next to the ramp to the platform was an escalator down to the exchange level, where three other escalator pairs (both up and down) linked to the inbound platform and the other end of the outbound platform (there was a pair of elevators there too). There were also escalators down to the Line 6 platforms, but I never got to check them out, or ride the Line 6 at all.
The platforms themselves were quite clean, and had ample seating. A couple of scattered countdown clocks told us both the time, the ETA of the next train, and some other useful system information (delays on Line 2, shuttle service on line 5).
 |
| One of the ticket machines within the mezzanine. It looked quite similar to the ones in Boston. |
 |
| A picture of some of the Metro tickets, taken the following day. The tickets cost more the further you go, so you have to enter your destination. You could go further than what the tickets “allow” you too, but we didn’t risk it. |
 |
| Some information on the namesake of the station probably meant for visitors to Madrid and tourists. Too bad it was in Spanish… |
 |
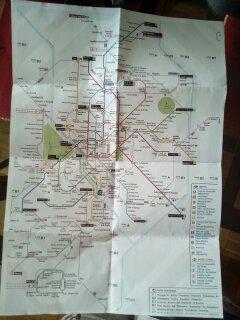
| A map of Line 3, with one side showing the station name and the other showing the connections. |
 |
|
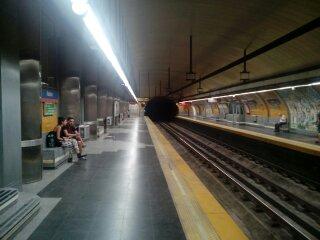
The platforms for Line 3.
|
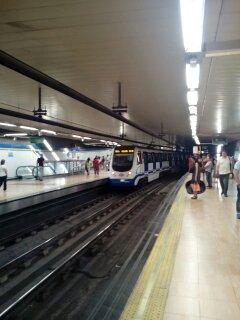 |
| A Line 3 train on the outbound side. In the picture, you can see the ramp leading up to fare control and one of the escalators down to the exchange level. This type of train was used on both of the lines I rode upon, so I can assume it’s standard with the Metro system (not the light rail trains, of course). |
 |
| The inside of the train that we rode inbound. Like the London subsurface trains, it was a continuous car, with 5 pivot points (so it was the length of a six car train). |
The station that we got off at was the huge Sol station, a transfer between the 1, 2, and 3 lines. Like Legazpi, Sol was clean and modern, with a large main room that has passageways leading off from it. This room was a quick escalator ride from fare control and the mezzanine, and the main room was on level with Line 2.
 |
| One of the main hallways located within Sol. As you can see, there’s a busker within it, and the hallway leads to the escalators to the main room. |
 |
| A view of fare control and the mezzanine from down the hall. Behind us is the exit to the Line 3 stairs, and way behind us is the Line 1 entrance seen in the previous image. |
 |
| A picture of one of the entrances to Sol, in the NYC style. The banner states that the elevators are being fixed, and that there is no accessible service at the moment. |
 |
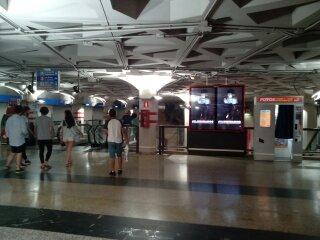
| Here’s the main mezzanine, taken from within fare control. The mezzanine is clean, modern, and efficient, with ample fare gates and ticket machines. We exited both through this area and came through it later in the day, as we headed home. |
 |
| Here’s a view of fare control past the main mezzanine. The escalators lead down to the bottom floor of the main room. You can see some of the ads within the station from here, as well as a sign directing the foot traffic. |
 |
| A view of the main room, from atop the second floor (I took it from the area seen in the last picture). If you go to the right, you end up in the Line 3 hallway. If you go to the left, you head to Line 2. The entrance to line 1 is also to the right, but it comes up immediately after turning. The large black object hanging from the roof is actually a sculpture. |
The next station we got to visit was Callao (pronounced Cay-yow), a transfer station between Line 3 and Line 5 (it also got commuter rail service, but we didn’t take it). Like the other stations, it was simple, modern, and efficient, though it had some nice decorations.
 |
| One of the entrances to Callao. This one was built like the standard NYC subway entrance, so the elevators were elsewhere in the square. |
 |
| A picture of Callao’s main mezzanine, showing the escalator from the more modern entrance (it had the elevator) and the fare gates. Unlike the other stations I visited, the pillars here were metal and reflective, and not just painted white. |
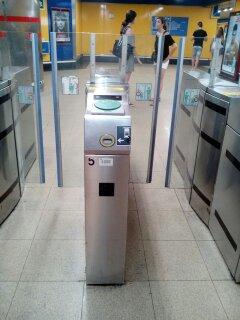 |
| A close-up on one of the fare gates (standard throughout the system). The slit at the front is for the tickets, and the green circle at the top is where you place the smart cards for the system (think CharlieCard). |
 |
| The Line 3 platform at Callao, looking quite similar to every single platform on Line 3 I had already seen. |
 |
| One of the countdown clocks located at Callao. It was working perfectly, though my (phone) camera caught it at a weird moment. As you can see, it tells you the destination of the next train, the time till the next train, and some other fast-moving information. |
The final station that I visited was Retiro, which I convinced my parents to go to after walking through the Royal Gardens (the other option was to go to Sol, which I had already been to). Retiro was on the Line 2, but was not a transfer station, and was two stops away from Sol. It seemed that the Madrid Metro had only modernized the transfer stations, as Retiro was old and not in good shape . The platforms were decaying, and there were stains on the walls. At least the technology (fare gates, ticket machines, countdown clocks, etc) was in top condition.
 |
| Retiro’s small mezzanine and fare control area. The ticket machines were located behind my current position to the right. I quite like how they put a countdown clock right at the entrance, so you would know if you had to run for the train. |
 |
| Retiro’s platforms, not in the top condition. The concrete was faded and the walls were stained. At least there was no water dripping on the floor (I’m looking at you, Haymarket). |
 |
| Both Line 2 and Line 3 (and probably the rest of the lines, due to a standard trainset) ran on overhead lines, which weren’t even wires! They were a third rail suspended above the train. |
Finally, on the second to last day, I walked down to one of the main roads and took a couple pictures of the buses going by. According to Madrid’s website, the bus colors have meaning. The blue buses only operate routes within the city, while the green ones go out into the suburbs (there are also the express yellow buses, which go to nearby cities, and red buses have the same job as blue ones). At one point I had more pictures, but they were deleted by my sister (still don’t know how she did that).
 |
| A route 135 approaching from the distance. |
 |
| A route 86, heading to “Vill. Alto”, which is the terminus for Line 3. |
And so, after three weeks on an international adventure, I returned home to Logan Airport. However, my family and I were faced with a problem. My grandmother, who left us halfway through the trip, had driven us to the airport, so we had no way to get home. Luckily, the previous night, I had thought of a solution. We ended up taking the Silver Line SL1 to South Station, then taking the Providence/Stoughton Line to Sharon (review coming soon), and finally calling a cab to get home.
 |
| Did you know that the SL1 had countdown clocks at the airport? Well now you do, and they’re pretty accurate! The bus ended up coming two minutes late, but that’s pretty minimal. |
 |
| I couldn’t get a picture of the front of the bus, so here’s the side. |
And that’s it! Between buses and trains in Israel and the metro in Madrid, I think my trip was pretty transit filled!
We take pride in our service, as we aim to please our clientele by providing a safe,
comfortable and fast service. We specialise within the Berkshire region where all
our vehicles and drivers are licensed and registered with the Royal Borough of Windsor
and Maidenhead. Nevertheless we also cater to clients from the South East and other
http://www.maidenheadtaxiservice.co.uk/